Beranda
/ Build A Kitchen Island / 10 Free Diy Kitchen Island Plans Diy Old Things : A diy kitchen island is a great way to add a custom centerpiece to your kitchen.
Build A Kitchen Island / 10 Free Diy Kitchen Island Plans Diy Old Things : A diy kitchen island is a great way to add a custom centerpiece to your kitchen.
Insurance Gas/Electricity Loans Mortgage Attorney Lawyer Donate Conference Call Degree Credit Treatment Software Classes Recovery Trading Rehab Hosting Transfer Cord Blood Claim compensation mesothelioma mesothelioma attorney Houston car accident lawyer moreno valley can you sue a doctor for wrong diagnosis doctorate in security top online doctoral programs in business educational leadership doctoral programs online car accident doctor atlanta car accident doctor atlanta accident attorney rancho Cucamonga truck accident attorney san Antonio ONLINE BUSINESS DEGREE PROGRAMS ACCREDITED online accredited psychology degree masters degree in human resources online public administration masters degree online bitcoin merchant account bitcoin merchant services compare car insurance auto insurance troy mi seo explanation digital marketing degree floridaseo company fitness showrooms stamfordct how to work more efficiently seowordpress tips meaning of seo what is an seo what does an seo do what seo stands for best seotips google seo advice seo steps, The secure cloud-based platform for smart service delivery. Safelink is used by legal, professional and financial services to protect sensitive information, accelerate business processes and increase productivity. Use Safelink to collaborate securely with clients, colleagues and external parties. Safelink has a menu of workspace types with advanced features for dispute resolution, running deals and customised client portal creation. All data is encrypted (at rest and in transit and you retain your own encryption keys. Our titan security framework ensures your data is secure and you even have the option to choose your own data location from Channel Islands, London (UK), Dublin (EU), Australia.
Build A Kitchen Island / 10 Free Diy Kitchen Island Plans Diy Old Things : A diy kitchen island is a great way to add a custom centerpiece to your kitchen.. An ideal space on all sides of a kitchen island is 48 to 54, but it should never be less than 36. Sand the parts, apply glue and assemble two half pilasters using nails. I really like this kitchen island. Sketch out a plan for your island. I'm going to show you how to make a kitchen island.
Diy kitchen island with trash can a. In this video you'll learn how to build a unique kitchen diy island unlike the traditional kitchen islands found in your friends or family members homes maki. Island can be rectangular, or use angled cabinets for geometric shape. It is great because it is diy which usually means less money being spent to have that extra prep space and storage. You will need a nail gun, chop saw and table saw.
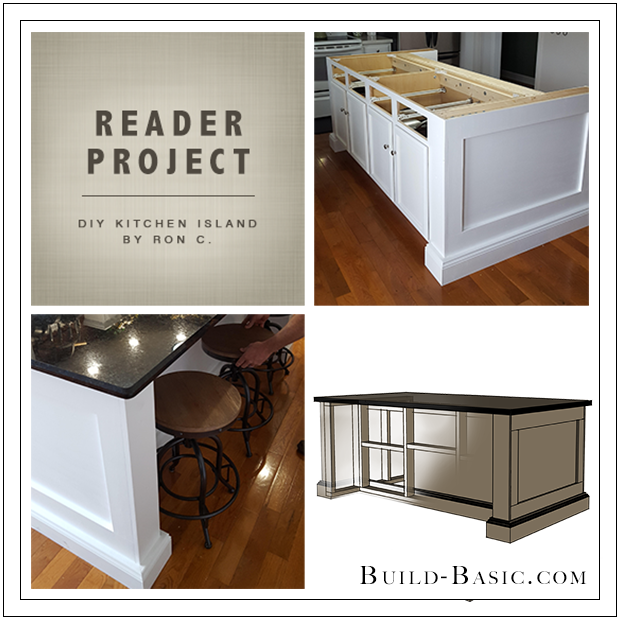
Download Build Basic Diy Kitchen Island By Ron C Diy Kitchen Island Plans Png Image With No Background Pngkey Com from www.pngkey.com All you need is some patience and free time to make this a success. Using the cut list provided, cut the legs, side aprons, side rails and stiles to length. A diy kitchen island is an affordable alternative for those with a moderate amount of home improvement experience. It also showcases a beautiful pine countertop. Place island in work triangle near major workspaces like stove and sink. With less than $200, you can build your kitchen island and have the storage space fitted with a foldout trash can. This simple project is easy to build and will expand counter, storage and eating space. Assemble the pilasters pilasters are a key element that make diy kitchen island designs like this one look sophisticated.
Extra countertop and storage space are just some of the many benefits of an island.
And it doesn't have to be complicated to build one. When we started our kitchen remodel, this exact island was quoted to cost just over $4,000 (not including the countertop…yikes!). You should leave plenty of room to freely move around the island. To build this kitchen island you will need, a circular saw, miter saw, wood filler, drill, sander, finish nailer, and a few other supplies are needed for you to nail this amazing project. The guide also comes with a lumber shopping list! Cut the plywood side panels to size as well. Everyone wants more room in their kitchen, and one way to create that space is to add a peninsula. Island can be rectangular, or use angled cabinets for geometric shape. All you need is some patience and free time to make this a success. Extra countertop and storage space are just some of the many benefits of an island. Prep the boards and build the side panels. This is one of the most popular purposes diy kitchen islands serve. But it also seems highly functional since it has a place to hide your trash can and store dishes or towels as well.
Diy kitchen island with trash can a. But it also seems highly functional since it has a place to hide your trash can and store dishes or towels as well. A diy kitchen island is a great way to add a custom centerpiece to your kitchen. (this post contains affiliate links) This is one of the most popular purposes diy kitchen islands serve.
Free Diy Kitchen Island Plans from www.thespruce.com How much does a kitchen island cost? You can easily make this for free or a couple hundred bucks! Glue the foot to the filler block (image 2), clamp into place (image 3), shoot a nail into place and take the clamp off and put another nail just off center (image 4). And instead of installing a trash can, a small compost bin will suffice. Put that pallet wood to good use and build yourself a kitchen island! Freestanding worktables or rolling carts can be had for as little as $200. I really like this kitchen island. It's easy to understand why.
Prep the boards and build the side panels.
Glue the foot to the filler block (image 2), clamp into place (image 3), shoot a nail into place and take the clamp off and put another nail just off center (image 4). Diy kitchen island with pull out trash can. And it doesn't have to be complicated to build one. An ideal space on all sides of a kitchen island is 48 to 54, but it should never be less than 36. Diy or hire a pro? The guide also comes with a lumber shopping list! And instead of installing a trash can, a small compost bin will suffice. A diy kitchen island is a great way to add a custom centerpiece to your kitchen. This pallet wood island has some storage space underneath and a handy storage system on the side for utensils. Sketch out a plan for your island. This is the first video. When it comes to creating a diy kitchen island a plethora of design options are possible. (this post contains affiliate links)
More features, larger sizes, and costly materials can easily push the price above $5,000. An ideal space on all sides of a kitchen island is 48 to 54, but it should never be less than 36. It is great because it is diy which usually means less money being spent to have that extra prep space and storage. I really like this kitchen island. Cut the plywood side panels to size as well.
How To Make Kitchen Island Out Of Cabinets Modern Kitchen Furniture Photos Ideas Reviews from autohaus-fleischer.com Prep the boards and build the side panels. Extra countertop and storage space are just some of the many benefits of an island. When it comes to creating a diy kitchen island a plethora of design options are possible. The best part of this island is the addition of interior lighting inside the cabinets. It is great because it is diy which usually means less money being spent to have that extra prep space and storage. Sand the parts, apply glue and assemble two half pilasters using nails. All you need is some patience and free time to make this a success. This is the first video.
But, if all you're looking for is some additional counter space with some extra storage beneath, then here is a simple way to build your own kitchen island in just four easy steps.
It's easy to understand why. And instead of installing a trash can, a small compost bin will suffice. With less than $200, you can build your kitchen island and have the storage space fitted with a foldout trash can. This simple project is easy to build and will expand counter, storage and eating space. Diy kitchen island on wheels: How much does a kitchen island cost? When it comes to creating a diy kitchen island a plethora of design options are possible. Using the cut list provided, cut the legs, side aprons, side rails and stiles to length. The guide also comes with a lumber shopping list! Because they can be accessed from all sides like the old kitchen table, they're ideal for a variety of kitchen tasks (see uses for a kitchen island, below). Everyone wants more room in their kitchen, and one way to create that space is to add a peninsula. You can easily make this for free or a couple hundred bucks! This kitchen diy project can be completed in one weekend for thousands less than it would cost to have one installed professionally, but it requires proper planning.
:max_bytes(150000):strip_icc()/Shanty-2-Chic-Kitchen-Island-584ae6b05f9b58a8cd495f53.jpg)
